Quantcast
Creative Personalization and Unique Gifts all with a Needle and Thread.

Pages

Wednesday, March 13, 2013

How to do Cutwork Machine Embroidery a Step-By-Step Tutorial


Hi Friends,

I am so getting ready for Easter and spring too!  Our trees are starting to bud and I've started my garden seeds indoors.  Warmer weather is on its way!! 

I want to show you a really sweet project cutwork Easter project.  It is a cutwork egg with Easter bunny inside.  You can read below what I am going to do with them.

This pattern comes from Advanced Embroidery Designs.   My machine's largest hoop size is 5 x 7 and this pattern is 5 x 8 I was shocked, but it works.  I don't understand why.  I figured it would say pattern too large for my machine, but it still fits inside my hoop.  I can't promise for your own machine though.  I actually picked this pattern up free last year.  They have monthly free designs.  If it wouldn't have been free, I would have been afraid to purchase it in thinking it wouldn't work for my machine.

This really is an easy project so don't let the name of the website fool you.  It took me about 1 hour 30 minutes to complete. 

1.  Choose your fabric.  Best to use a small print.  I used a bright pink tone on tone for the first one and white thread.  For the second I used an off white tone on tone fabric with pastel variegated thread.  Have a full bobbin wound for this project too as well as a fresh sharp embroidery needle.
2.  Hoop fabric right side up with a water soluble stabilizer underneath.  Both are in the hoop.  Hoop tightly. 

3. The first stitch out is a straight stitch around the outside of the egg. Remove your hoop from the machine and cut away a bit of the fabric on the outside of this stitching. I cut away about a half inch which you can see below.  Look closely.  The stitching is on the INSIDE of where I cut.  I cut out a half inch on the OUTSIDE of the stitching.  REMEMBER THESE TWO THINGS:  1. ONLY REMOVE YOUR HOOP FROM THE MACHINE. DO NOT REMOVE THE FABRIC FROM THE HOOP!  2.  DO NOT CUT YOUR WATER SOLUBLE STABILIZER.  ONLY CUT AWAY THE FABRIC!  (I'm not trying to sound bossy here ;-)  I just really want to emphasize these two things.) 

 
Cut very close to the stitch line for best results. On the first sample I did, the pink one, I was afraid to cut too close and that left frayed edges that were difficult to clean up. On the second sample I cut as close as 1/32" to 1/64" of an inch, very close to the stitching!

 
4. The second stitch out is an outline of the inner part of the egg and an outline of the interior design.
5.  Again remove the hoop from your machine and cut away only the fabric between the bunny and the inner egg.  Keep the stabilizer intact.  An applique scissors is a very handy tool to cut close to the stitching line.


6.  The third stitch out is all the lace work and design.  This is the part that takes the longest.  Just sit back and check out some blogs and read a bit while the machine does it's magic.

7.  For the fourth and final stitch out it is a decorative stitch between the inner and outer egg lining.  You can change thread color if you like for this.

8.  Remove hoop and remove fabric from hoop.  Cut stabilizer close to the outside of the egg and place entire project in water.  This will dissolve the water soluble stabilizer.  Dry.  Press.  Enjoy!!!

I'm going to glue the pink one to the outside of an Easter card and attach a pretty ribbon as well.  For the pastel on the right I'm going to stitch it to a placemat.  I'll either put that placemat in the center of the table with a basket of candy or I will make 6 more of these and make a total of 7 placemats for everyone at our Easter dinner.  I've got to decide on that first. 

Enjoy and Easter Blessings to you,
Nancy
This post links to:
_
Creations by Kara

Wednesday, March 6, 2013

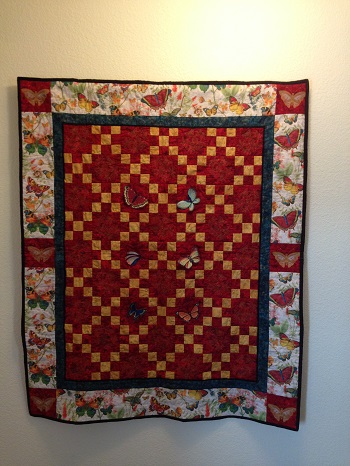
Machine Embroidery Butterfly Quilt

Dear Friends,
Last spring/summer I took a quilting 101 class.  My mother and mother-in-law are both quilters and that is one thing I had never tried my hand at.  What you see is my very FIRST quilt I have ever made! 
Yesterday I was doing some spring cleaning and working on the garage.  While in there I pulled out the Easter decorations.  I set the dining room table for Easter and then put away my winter quilts that my mother has made for me. 
As I put away the winter quilt that I had on this wall, I was excited to pull out my quilt.  I actually finished it before Christmas this past year but tucked it away until now.
As I was assembling this quilt I really wanted to do more with butterflies.  I found all the butterfly designs you see on this quilt at Embroidery Library with the exception of the one you see below, the one in the corners of the quilt.  I received that design in one of my embroidery club classes at our local sewing store and it was given to me by the instructor.  I don't know who to credit this design to.
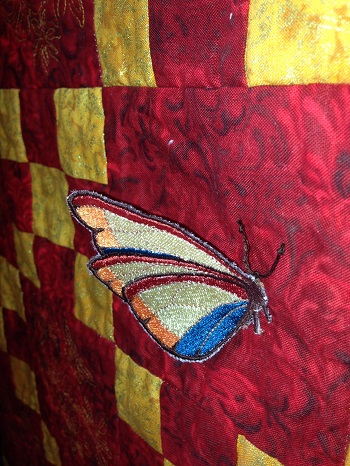
The six butterflies in the center were embroidered on Floriani's "No Show Nylon Mesh Non-Fusible".  To use this product, when the solid design is finished stitching, cut close to the embroidery design.  Then use a heat source such as a mini iron, stencil burner or wood burning tool to melt away the edges of the mesh from around the design.  ***Caution***Don't touch the embroidery design with the heat source or your thread can easily melt.  Do this carefully!!!
Then I stitched the butterflies onto the quilt by hand for a 3-D effect.
For the antennae, I used dark brown embroidery floss and tied knots in the end.
I used monofilament thread to quilt this by stitching in the ditch between the larger red squares and the 9 patch squares.
All the remaining blank red squares were quilted with this Embroidery Library design.  These designs on the red squares were embroidered with cotton quilting thread.
Thanks everyone for looking.  I hope you enjoyed this!
 
Happy Embroidering and spring blessings to you!
With Love,
Nancy


Thursday, February 28, 2013

Machine Embroidery - St. Patrick's Day Applique Shamrock and More!

Hi Friends,
I'm having a little St. Patrick's Day fun in doing this machine embroidery applique shamrock.  All designs from Needle Little Embroidery.  I did this on a tote bag from the Dollar Tree!  The applique fabric is glitter fabric from Hobby Lobby.  It comes in cuts 8 1/2" x 11 1/2" and is found by the cut felt.  $1.47 for the piece minus my 40% coupon.  It is a cotton fabric that has glitter bonded to the surface of it and it embroiders quite nicely.  I think it would be perfect material for an applique Christmas tree or tags on Christmas presents.  With its shine it would make some great Christmas ornaments, or how about Easter tree ornaments made with pastel glittered sheets.  I'm really thinking I will go back and pick up some more of this fun fabric in other colors!

 
Next it was onto making two St. Patrick's day coasters.  You will never guess what these are stitched on......

 
Here it is!  Grip Prints rubberized shelf liner from Contact.  I got this at Target.  It stitched beautifully on it.
The final simple secret...Adhesive backed cork board, found in the scrapbook section of your craft store.  This makes a perfect coaster.  Note:  I stitched the blanket stitch around the designs when they were finished.

Happy Embroidering,
Nancy
disclaimer: I received these designs for free. The opinions of the designs and Needle Little Embroidery are my own.

Monday, February 25, 2013

My Very First Digitized Embroidery Design

Dear Friends,
I did it!  I created my very first manually digitized embroidery design!  I'm doing the happy dance here.  Never mind the fact that it is  a simple design, and I did have issues that I now know how to resolve, I still did it!  I finally jumped into the water.
 
I used my Generations software to create this "Hope" card.  One thing I really must mention is that I've been watching Holly and Larry Pike's videos over at You Can Digitize and they have really supplemented the training videos that I received from Generations with my software.  If you are looking for digitizing lessons with Generations, Holly is an excellent teacher.  Another thing is her voice is easy to listen to.  Even though I don't know her, she and her husband Larry seem like genuinely nice people who I someday hope to meet.


I stitched the design out as an applique onto gold felt.  Then I layered yellow felt on top and then stitched the lettering.  It is all sitting on a gold glitter piece of cardstock and this will be used as a card.  The recipient could use it as a bookmark.  Around the outside of the design, rather than doing a typical applique satin stitch, I used a cross stitch.  I waited until the design was completed and then just trimmed the felt close to the stitching.  With felt, there is no need to worry about fabric raveling.

Other than first fixing my digitizing mistakes, the next item on my agenda is to figure out how to place the design here as a free download for all of you.  I'm open to suggestions if you would like to contact me. 

With hugs and blessings,
Nancy
ps.  I'm recovering well from my hernia surgery that I had last Friday.  I'm up and around more today.  Going through surgery of course is no fun, but it literally forced me to stay off my feet for a few days.  I had my laptop right next to me and got to go through the You Can Digitize videos while recuperating.  What a fun way to spend my days in bed.

Thursday, February 21, 2013

Machine Embroidery - An Irish Blessing Embroidered Card

Hello Sweet Friends,
I hope you are all staying warm and healthy wherever you are.  It has been very cold here in New Mexico, in the 20's with lots of wind making it even colder.  Brrrrr!!  Not much snow where I am, but lots of snow on the mountain.
 
That means I stay INSIDE and I get to sit at my embroidery machine as I get a chance.
 

The Irish Blessing is a design from Michelle at Needle Little Embroidery.  I stitched it onto glittered felt.  I brought the felt in an 8-1/2 x 11 sheet at Michaels or Hobby Lobby.  I don't remember which.  After stitching it out, I cut the felt to about 1/8 inch of the design and then used fabri-tac to glue it onto a piece of folded cardstock. 

When embroidering on the glittered felt, I hooped a piece of medium weight cut-away stabilizer and floated the felt on top.

I also added a piece of sheer ribbon.  There are 2 small 1/8" holes punched in the cardstock at the top of the card.  The ribbon just gets looped through those two little holes and then cut at an angle.  It lays flatter this way rather than tying into a bow.

I'm not Irish, I've got English and German blood in me, but I still wish you all this beautiful Irish blessing. 
"May your blessings outnumber the shamrocks that grow
and may trouble avoid you wherever you go."
 
With warm blessings,
Nancy
ps.  I hope you will add me to your prayer list as tomorrow I am having much needed and long overdue hernia surgery.  Thank you.

disclaimer: I received this design for free. The opinions of the designs and Needle Little Embroidery are my own.


Tuesday, February 19, 2013

Machine Embroidery Floriani Event

My local sewing store has a yearly Floriani event.  This is the second year I've attended and it is not only a good time but a great learning experience.

The instructor covers use of all forms of stabilizers and ways to help make our machine embroidery the best it can be.  Also covered is the Floriani digitizing software.  Even though I have chosen Generations as my digitizing software, listening to instructions and gaining ideas with other software is inspiring.
Here you can see all the goodies we each received; a thread color chart, 5 cd's of embroidery designs, 10 spools of Floriani thread and two packets of all the different stabilizers that Floriani sells, one to fit the 4 x 4 hoop and another packet to fit the 5 x 7 hoop. 

Yes, it was a good day and even better is I attended with a dear friend and fellow machine embroiderer.

Have a fun day stitching!
Nancy

Sunday, February 17, 2013

Trapunto Machine Embroidery on Fleece

Dear Friends,
Fleece is such a fun fabric to sew on and it makes a perfect surface for doing trapunto style machine embroidery.  Trapunto is an Italian word which means "to embroider".  In Latin it means "to prick with a needle".  Quilters will occasionally use this technique to puff up part of their quilts.
 
My local sewing machine dealer, Ryan's Sewing and Vacuum holds an embroidery club which I belong to.  In class we made this pocket scarf and did the trapunto machine embroidery on it.


See how with trapunto, part of the design remains raised due to the fleece.  Like I said, I really enjoy fleece.  It cooperates and doesn't slip and is just super soft and warm for the winter months. 

The embroidery design is from Stitch Delight.

Now, would you like to see the most exquisite example of trapunto?  I'm sure this was done with a long arm commercial quilting machine.
Take a look!

Oh how I would love to have this on my bed!  It is from Biltmore, For Your Home Trapunto Quilt Collection.  I can dream right!  Did you see the chandelier in the bedroom? 

Happy Embroidering,
Nancy This post links to: 125
Related Posts Plugin for WordPress, Blogger...